Hubitat EASY Home Automation – Without Rule Machine!
Hubitat Rule Machine can be a little overwhelming for first time users. The good news is, there are easier places to start your powerful home automations in Hubitat. We’ll look at four often overlooked apps that are user friendly. The apps include Motion Lighting, Simple Automation Rules, Groups and Scenes, and Button Controller. For the most part, you should only rely on Rule Machine if you want or need conditional statements. Conditional statements are IF-THEN-ELSE types of rules. These take some time to plan and implement. So, if you don’t need them, there’s no need to start there.
Overall, you find that these four apps are packed with power and can cover many situations. Below you’ll find a brief introduction to each and some common ways they are used.
Purchase Hubitat Elevation on Amazon
Installing the Apps
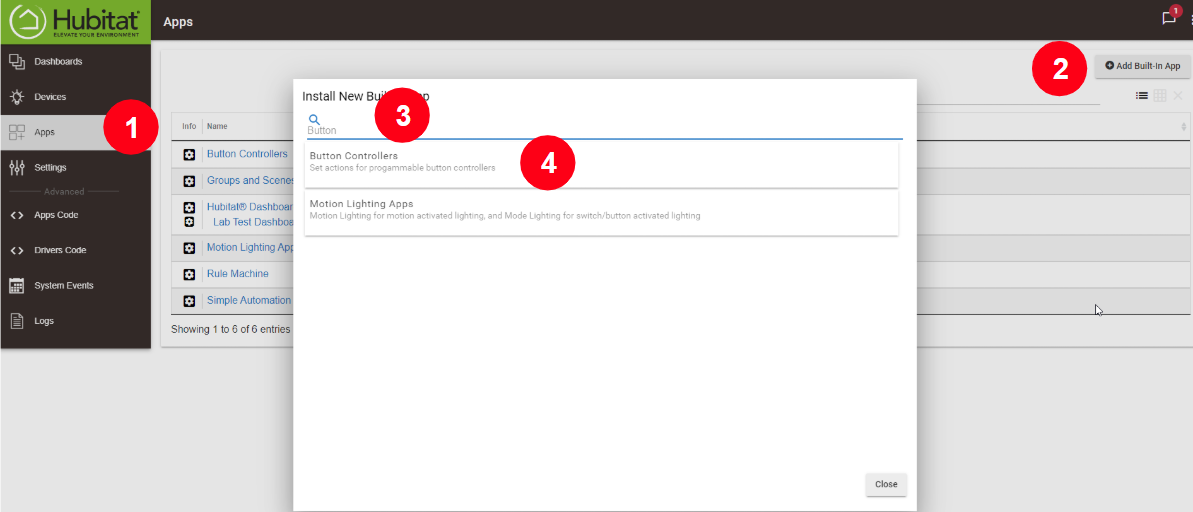
When it comes to accessing these apps, remember that they do not come pre-activated on your hub. This means that you’ll need to go to your Apps page and install them.
- Click on the Apps tab on the side menu.
- Click on the Built in App button.
- Search for the app you want to install (e.g. Button, Motion Lighting, etc.).
- Click on the app you want to install.
Watch the Video
1. Motion Lighting App
The app is just what it says. Control various automations around your home using motion sensors. Motion is a great method of ensuring that you have exactly what you need when you need it. I personally use motion for turning on lights in my closets, bathrooms, garage, entry way and much more. One of the nice features is that you can have one or more sensors activate the motion rule.
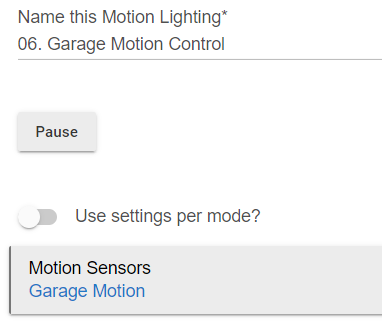
To get started – give your motion rule a name then select your motion sensor(s).
Next you’ll have the option to select the lights you want to turn on. To access this function, open the Lights to turn On panel on the main page. Don’t let this one fool you, it’s more powerful than it looks. From here you’ll have the ability to:
- Set dimmer levels
- Set color bulbs RGBW values
- Set color temperature on tunable bulbs
- Push buttons
- Turn on switches
- Activate scenes.
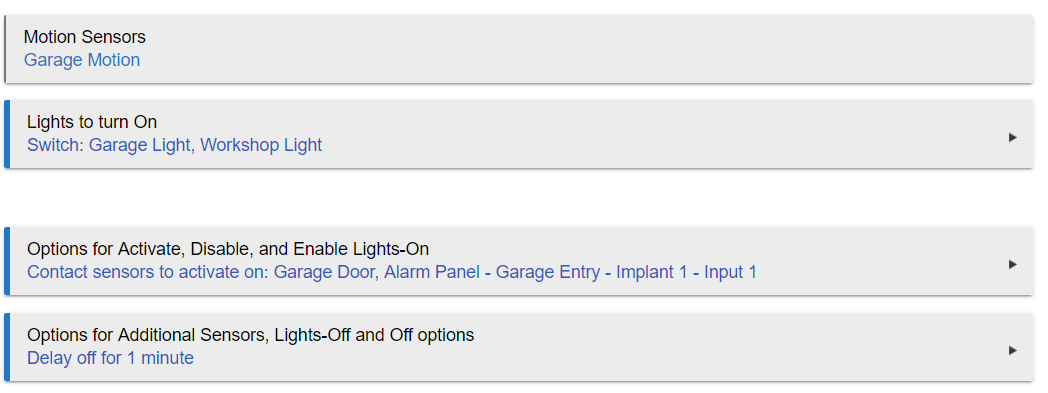
Options for Activate, Disable, and Enable Lights-On
This panel is another powerful area of Motion Lighting app. It provides you with the ability to amp up your control. For example, what if you wanted to use a switch or a button to perform the same function as motion detection? I’ll give you an example. I have a motion detector in my garage that turns on the light. I also want the lights to come on any time I open my garage entry door. Either way I’m headed into our out of my garage. Linking the rule to my garage entry contact sensor turns on the light before motion is even a factor. If I’m moving around in the garage, the motion sensor takes over and keeps the lights on for me.
Here are all the other ways you can control the same lights through these settings:
- Buttons to turn on lights.
- Buttons to toggle on/off – that’s right, you can use a single button to turn the lights on and off.
- Buttons for disabling turning on – if you have a button, you can use it to disable the ability for the motion detection to turn on the lights.
- Button to enable turning on/off – if you used a button disable the motion detection turning on the light, you can use a button to re-enable the motion detection.
- Switches to turn on lights – you can use a separate smart switch to turn on the same group of lights.
- Contact sensors to turn on lights – as mentioned above, I use contact sensor to turn on the garage lights. Very cool stuff.
- Enable on/off at time – not interested in the lights coming on during the day? You can set the motion to only trigger the lights between sunset and sunrise. I use this setting for my front porch lights.
- Contacts to disable turning on – this is the reverse of what I use. If the contact is open (or closed depending on how you set it), it will prevent the lights from coming on when motion is activated.
- Turn on only if lux is less than this value – if you have an illuminance sensor (which many motion sensors have), you can create a setting to only allow the lights to turn on when it’s dark.
- You can also use modes to disable turning on.
Wan’t more help? Join the DIY Smart Home Guy Facebook Group! It’s the best place to ask questions and get help on topics covered in my videos and on my website. There are lot’s of other smart people there as well. If I can’t help, maybe someone else can. Give it a shot. |
Options for Additional Sensors, Lights-Off and Off Options
Now Hubitat is just showing off. Clearly the engineers at Hubitat have created some very clever options out of their own necessity. I mean, how else would you come up with all of this.
Are you worried about the lights shutting off after motion stops when you really want them to remain on? Well, check out these cool features.
- Additional Motion Sensors to keep on – if you have other sensors that you don’t want to trigger the lights to turn on, but you know that if there is motion in these other areas you wan to keep the lights on, you can add the additional sensors here.
- Additional switches to turn off when turned off – this should actually say, “additional switches to turn off when motion stops”, since that is what’s happening.
- Buttons to Push when turned off – this should actually say, “buttons to push when motion stops”, since that is what’s happening.
- Buttons to turn off lights – if you want to turn off the lights from a button, you do it from here.
- Switches to turn off lights – you can have other switches control all the lights that are activated from the motion sensor(s).
- Contact sensors to turn off lights when closed – You can use things like door closed sensors to turn off the lights rather than wait for the motion to stop.
- Buttons to disable off – want to leave the lights on after motion stops? Use a button to disable the auto-off feature.
- Switch to disable turning off – just like the button above, but uses a switch state instead.
- Contacts to disable turning off – just like the switch and button above, you can use an open or closed contact to disable turning the lights off.
- Don’t turn off between two times – this is the reverse of only turn on between two times, but it prevents the lights from turning off.
- Turn off if Lux exceeds this value – will automatically turn the lights off when it gets bright enough.
Control with Alexa or Google Home using this name:
Yeah – you guess it. If you add a name here, Hubitat will add that as a device that can be accessed by Alexa and Google Home. You can use this similar to how you would use a switch to turn on the lights that are controlled by the motion sensor(s).
 |
 Aeotec Multisensor 6, Z-Wave Plus 6-in-1 on Amazon |
 Zooz 4 in 1 Sensor on Amazon |
2. Simple Automation Rules
Simple automation rules allows you to put together some reasonably sophisticated if-this-than-that types of rules. While they are simple, they do provide you with a sufficient level of control to allow you to avoid Rule Machine. Simple rules always start with ‘What do you want to control’, rather than ‘what is the trigger’. You could say they are do-this-when-that rules.
Everything starts with identifying which switches, bulbs or dimmers you want to control.

Once you’ve identified what you want to control, you identify the ‘what you want to do’ by picking from the options on the list as shown below.

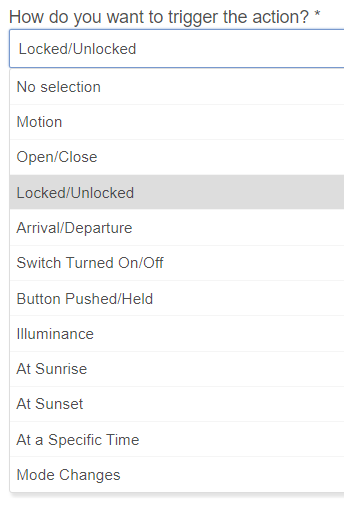
Next up is defining the triggers. To do this, simply pick the appropriate trigger from the list as shown below. In my example, I’m going to turn off a light when my lock is locked.
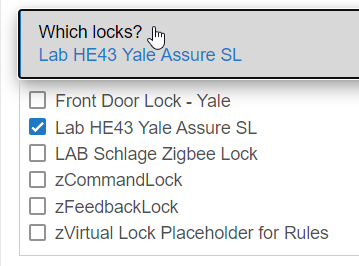
Once you pick the type of trigger, Hubitat automatically recognizes the available devices capable of triggering that particular event type. In my case I picked Locked/Unlocked, so Hubitat presented me with my list of locks as shown below. You’ll notice two things: 1) you can select multiple devices to act as the trigger; and 2) it allows me to choose from my virtual locks as well.
This is the simplest of rules that can be created. But in true Hubitat form, there are additional capabilities. These include:
- Turn on after some time (since we selected turn off as our action).
- Edit Rule Name (if you don’t like how Hubitat names it in the first place).
- Restrictions
Restrictions
This is where the sophistication comes into play. When you open the restrictions panel, you will see the following options:
- Only between two times (this includes sunset and sunrise with offsets).
- Only on certain days of the week (leave blank for every day).
- Only when mode is (leave blank for all modes).
- Only when Illuminance is (equal or lower, equal or higher).
- Switch to disable Simple Automation Rule – this allows you to have a switch to disable/prevent the rule from running. You can use this restriction when the disabling switch is either on or off.
3. Groups and Scenes
Groups and scenes can save you a lot of time when setting up automations, especially when you have several lights that you want to act as one. In short, a Group is simply a collection of lights or switches that you can control together. A Scene is collection of lights or switches that you want to control in different ways. For example, I have 6 smart LED bulbs in my kitchen that were previously controlled by a single on/off switch. Since these are smart bulbs, I want them powered all the time. I created a Group called Kitchen so that they will all behave as one light, just as before. A scene, on the other hand, can specify which lights in the collection are on and off, which color level or dim level.
3.1 Groups
In this example, I have four smart LED lights above my bathroom vanity. Three are simple white Zigbee lights, and one in an RGBW light that I use for garage and entry door warning. You can see in the image below that you can only add Bulbs, Dimmers and Switches to a Group.
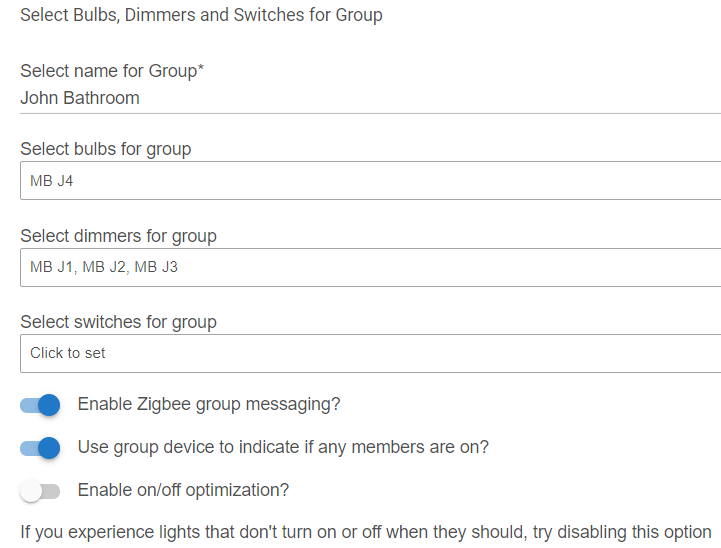
If they are all Zigbee lights, you can enable Zigbee group messaging. Zigbee group messaging uses a multicast feature to turn all lights on and off together to eliminate the “popcorn effect” associated with each device being controlled by separate commands from the hub.
The “Use group device to indicate if any members are on” switch controls how the state is indicated for the Group on the device page, dashboards and in other rules.
- Turning this option OFF will show the Group as On if All light are on. If any lights are off, the Group will show as off.
- Turning this option ON will show the Group as On if Any lights are on. If any lights are off (with at least one on), the group will show as on.
Enabling on/off optimization will prevent a command (on, dim or off) from being sent to a device that it already thinks is in the desired state. For example, if the hub thinks a light in the group is already off, it will not send a redundant off command. If you are having trouble getting some devices to turn off or on and this option is enabled, disable the option and see if that makes it perform better.
3.2 Scenes
Like Groups, Scenes are used for controlling a collection of devices. Unlike Groups, you can control all devices in the Scene individually. For example, you can specify that some devices are on and other are off. You can also set dim and color levels individually. Just like Groups, Scenes can only be used for bulbs, dimmers and switches. However, you can also specify that you want to push a button There is also a Restrictions feature that behaves just like the Restrictions in the Simple Automation Rules app.
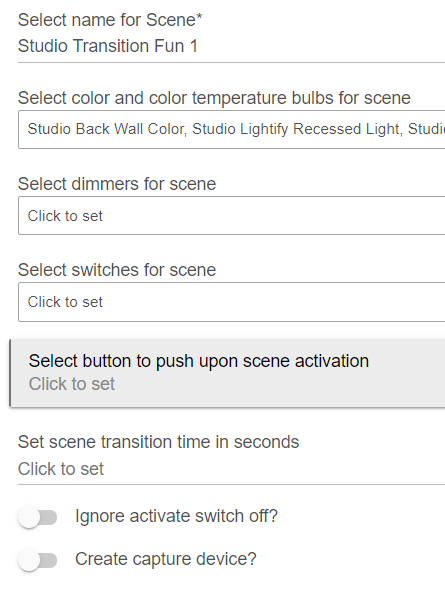
- Ignore Activate Switch Off – prevents the will prevent scenes from being turned off from the Scene device that is created automatically by Hubitat. This is useful on Dashboards and Alexa/Google Home.
- Create Capture Device – this will create a button on your device list that can be used to capture the scene either from your dashboards or from an automation rule.
Capturing Scenes
There are two ways to capture scenes: 1) you can set them up manually using the Adjust Scene Setting panel at the bottom of the page; or 2) you can use the Capture/Re-capture button on the top of the scene page.
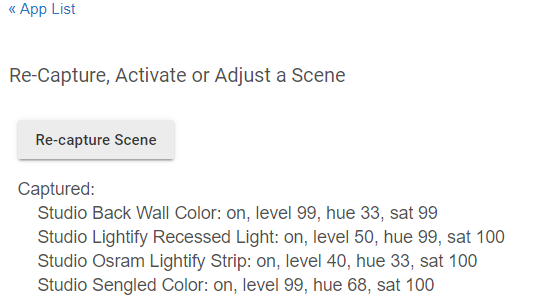
To use the Capture/Re-capture button, set all devices in the scene exactly how you like them. This includes:
- On/Off state
- Dimmer Levels
- Tunable White Settings
- RGBW Colors
Once everything is exactly how you like it, go to the scene settings page and press the Capture/Re-capture button.
NOTE: In some cases I’ve found that the capture does not correctly store the OFF state. You may need to go into Advanced Scene Settings and set the device to off.
After everything is captured, use the Activate Scene
Restrictions
This is where the sophistication comes into play. When you open the restrictions panel, you will see the following options:
- Only between two times (this includes sunset and sunrise with offsets).
- Only on certain days of the week (leave blank for every day).
- Only when mode is (leave blank for all modes).
- Only when Illuminance is (equal or lower, equal or higher).
- Switch to disable Simple Automation Rule – this allows you to have a switch to disable/prevent the rule from running. You can use this restriction when the disabling switch is either on or off.
3.3 Scene Transitions
Scene Transitions allow you to gradually morph one scene into another scene. In this example, my Studio Transition Fun 1 scene creates a red – green – blue spectrum of light using my four studio color bulbs. Studio Transition Fun 2 reverses the spectrum. You can then create a Scene Transition to morph scene 1 into scene 2.
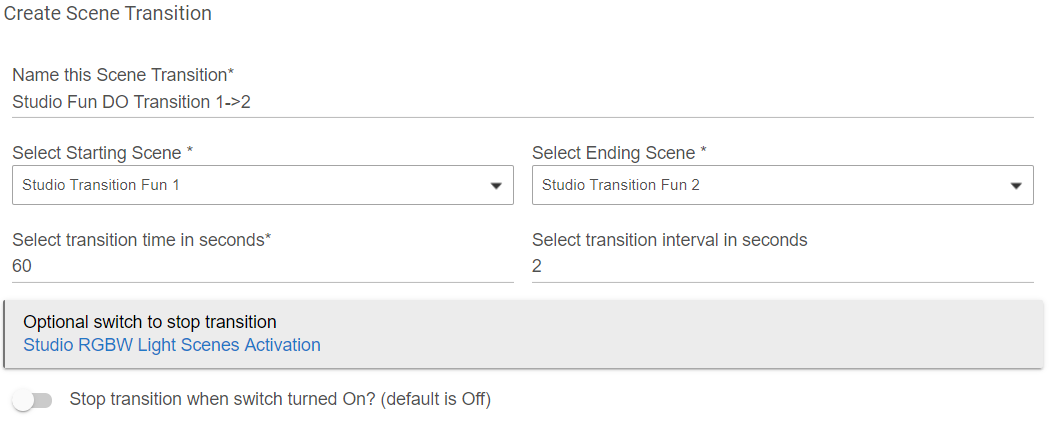
- The transition time is how long the entire transition will take from beginning to end. In this case 60 seconds.
- The transition interval is how often the lights update as they move across the spectrum. Shorter interval seconds will create a smoother transition.
- You can set an optional switch to stop the transition as well. In this case I use a virtual switch on a dashboard.
4. Button Controller
Buttons are one of my favorite smart home devices, especially those that are compact and portable. As you’ve seen in many of my videos, I really like the Lutron Pico Remote and have the scattered all around my house. Since we started using buttons, the number of voice commands we use has dropped to nearly zero. I can either say, “Alexa, turn movie night on” or I can push button next to my sofa that does the exact same thing. Button are just so much easier.
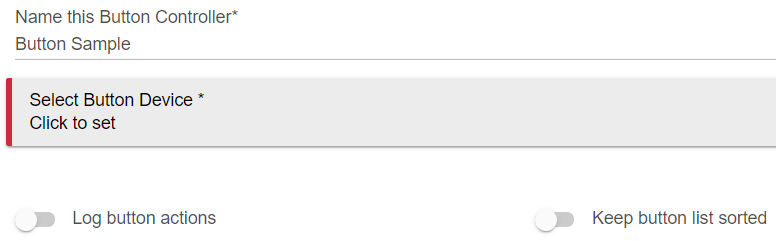
Button Controller is very handy in that you can configure it to sense all of your button-press events, and you can then create rules for each of those events in one place. To get started with Button Controller, perform the following steps:
- Give your button a recognizable name.
- Select your button device.
- I recommend turning on the “Keep button list sorted” option.
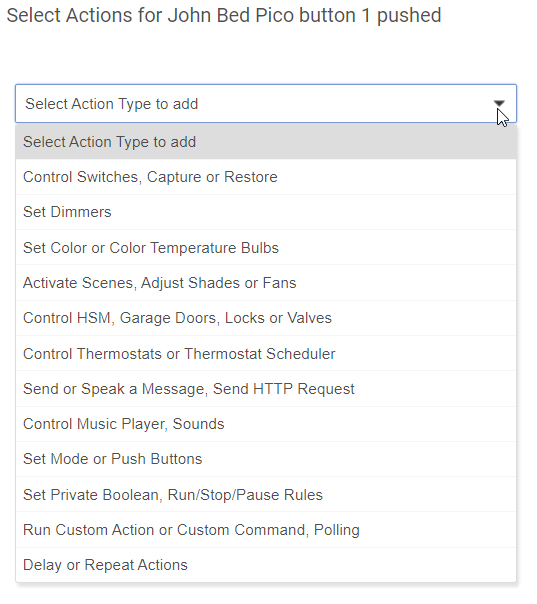
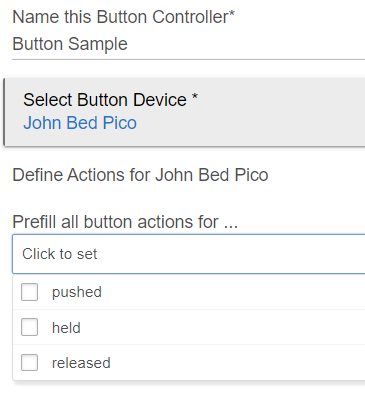
Once you select the device, Hubitat will ask you which button actions you wish to prefill. Your options are Pushed, Held, and Released.
Once you’ve selected the actions to prefill, Hubitat will automatically create a panel to begin each button event as shown below.
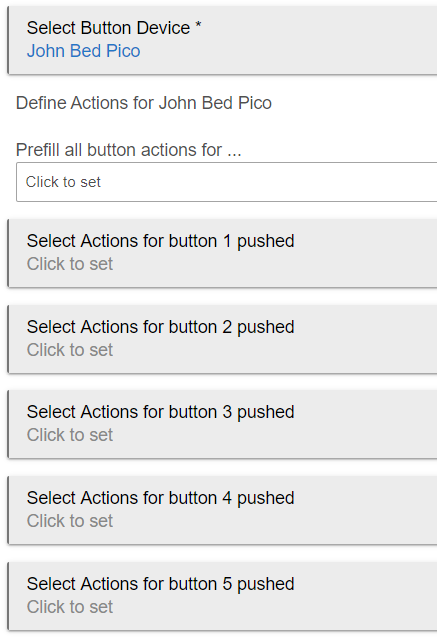
From here it’s as simple as creating your automations. There are many options here, so it’s best that from here you explore and experiment. Button Controller will allow you to create nearly all of the same rules that you can in Rule Machine except for Conditional Actions. The picture below will get you started.