Alfred DB1 Z-Wave + Bluetooth Smart Lock
Alfred is a relative newcomer to the smart lock market. I first learned about them at CES 2020 when I passed what I thought were some of the most interesting locks I’ve ever seen. Very sexy in my opinion. Currently Alfred makes an entry-level line (DB1) and a professional line (DB2). This article discusses the DB1 line, which has four models. The DB2 will be discussed in a different post. All locks in the DB1 line have built-in Bluetooth which allows you to connect to the lock locally with the Alfred app. You can enable Wi-Fi on all locks in the DB1 line by purchasing the WB1 Connect Wi-Fi Bridge.
The Alfred app is very clean and allows you to control all settings that are available from the keypad. There are a few additional features including a Bluetooth power saver mode and the ever popular one-touch unlock.
 |
 |
 |
 |
| Bluetooth + App | Bluetooth + App | Bluetooth + App | Bluetooth + App |
| Z-Wave | Z-Wave | ||
| Wi-Fi Capable with WB1 Bridge | Wi-Fi Capable with WB1 Bridge | Wi-Fi Capable with WB1 Bridge | Wi-Fi Capable with WB1 Bridge |
| USB Emergency Power Port | Key Override | Key Override | USB Emergency Power Port |
Overall Rating 
To put it simply, for an entry level smart lock, this lock hits the mark. I’ve tested other locks with Bluetooth and they don’t seem to be as well thought out as the Alfred DB1. For example, the Yale YRD256 offers Bluetooth, but only with their CBA model. If you get the Z-Wave module for the YRD256, no Bluetooth and no app. While the DB1 app can only be used while in close proximity to the lock (unless you purchase the additional Wi-Fi Bridge), you still have geo-fencing, which enables the one-touch unlock through the Bluetooth app. I’ve not tested any other Z-Wave lock that allows this.
While we’re talking about the app, it’s very easy to use and was a pleasure to work with. I found myself not even bothering with the keypad programming since everything could be set from the app itself. Yes it a minimalist app, but that’s OK for this lock.
The lock also performed very well in my endurance testing. It did go through batteries quicker than I expected, but the original batteries were at 82% after nearly 1500 cycle tests. Assuming you have good alignment on your door, this will give you up to a year of trouble-free locking and unlocking. I also preferred the USB emergency power port over the 9 volt battery option found on other keyless locks. I’m more likely to have some sort of USB power bank over a 9 volt battery any day of the week.
There are no add-on modules required for this lock, which is very nice. Everything is built in so there’s no issue with the user dropping and or destroying the extra module.
Wan’t more help? Join the DIY Smart Home Guy Facebook Group! It’s the best place to ask questions and get help on topics covered in my videos and on my website. There are lot’s of other smart people there as well. If I can’t help, maybe someone else can. Give it a shot. |
Description
The Alfred DB1 lock series provides both keyed and keyless models, all of which have Bluetooth built in and option Wi-Fi. Two models, DB1-B and DB1-C also provide Z-Wave Plus for connections to a compatible Z-Wave smart home hub. All DB1 series locks provide the following capabilities:
- Micro USB Emergency Power on Keyless Locks
- Up to 20 Lock Codes
- One Touch Unlock (from Alfred App)
- Auto Re-lock (30 seconds)
- One Touch Lock (keypress for 2 seconds)
- Security Shutdown after 10 consecutive missed unlock attempts from keypad
- Away Mode (disables all buy Master PIN)
- Fake PINS (random numbers preceding PIN)
Ease of Installation 
The DB1 lock is very easy to install. All that is required is a normal Phillips head screw driver. That is of course as long as you don’t have to make any modifications due to the door itself. The DB1 fits standard door sizes with a 2 3/4 or 2 3/8 backset. It does take a little finesse aligning the screws between the keypad and inner mounting plate, but it’s not bad at all.
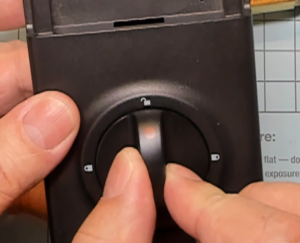
 The most common problem encountered during the install is remembering to set the handing of the lock. There is a small switch on the back of the motherboard. You’ll need to make sure that you have this properly set before installing the motor unit onto the mounting plate.
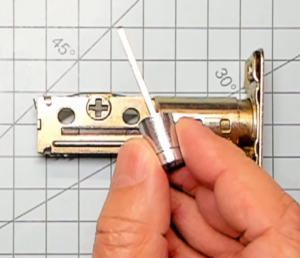
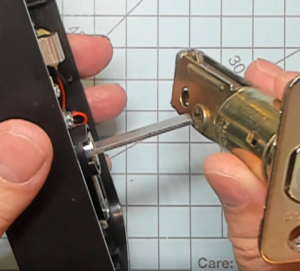
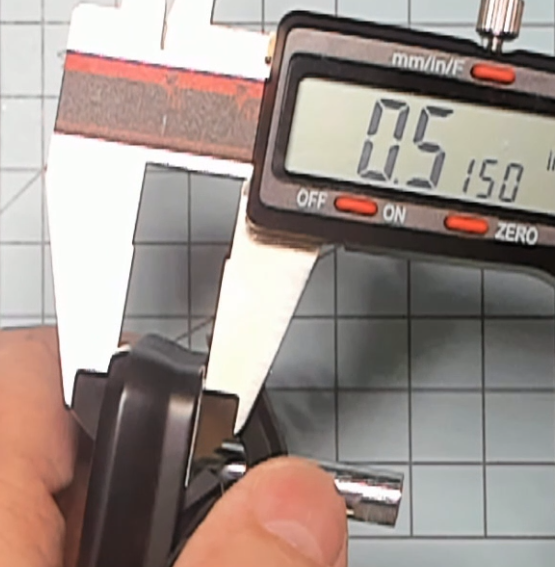
The next issue that is a little confusing is the installation of the pin that drives the deadbolt itself. This must be inserted properly into the bolt with the correct orientation and then into the thumbscrew.
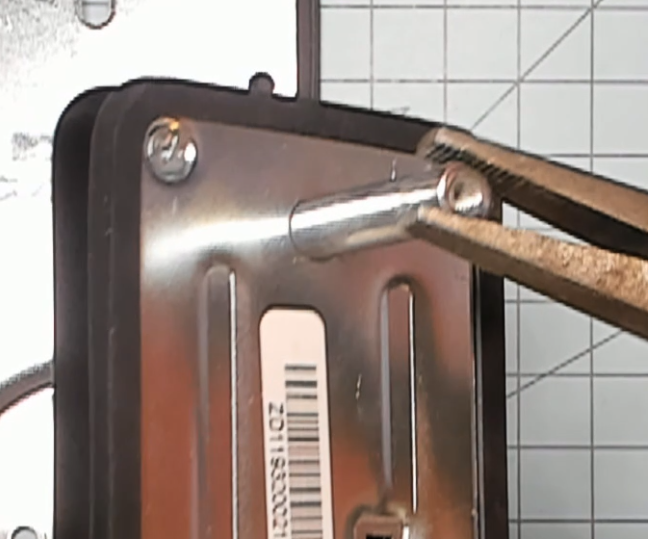
Step 1 is to ensure that the bolt is in the unlocked position and that the thumbscrew is centered in the vertical orientation as shown in the images below.
Step 2 is to insert the drive pin into the bolt while ensuring that the notches are aligned on the drive pin barrel and that the pin itself is properly oriented in the deadbolt.
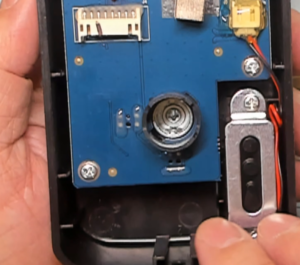
The last item to discuss when it comes to the installation is the extra mounting post that comes on the top of the lock. At first glance you would believe that you need to drill an extra hole in your door. If that doesn’t please you, don’t worry. The post can be removed easily with a pair of pliers. If you decide to keep the post, Alfred provides a template to assist in putting the new hole in the proper location on the door.
Ease of Programming 
Programming can be performed from the DB1 keypad or from the Alfred app. Trust me, you will want to use the Alfred app. Once the lock comes online, you will need to change the master passcode/PIN. Here is how I recommend that you proceed.
- Install the Alfred app on your smart phone.
- Once the lock is installed, add the lock to the Alfred app.
- You will be prompted to update the pin code automatically. It doesn’t get any easier than that.
If you need to use the keypad for programming (for example Z-Wave pairing can only be accomplished from the keypad), you will need to know your master passcode. All commands begin with pressing the asterisk twice (* *) – master passcode – pound (#). You’ll hear a double beep, which means success. If you hear three-beeps, you did something wrong.
The following is the sequence for Z-Wave pairing:
- * * – master passcode – pound # (beep beep)
- 8 1 # (beep beep)
- You’ll hear an additional set of tones (beep beep) when it has paired with your hub.
To remove from your hub, do the following:
- * * – master passcode – pound # (beep beep)
- 8 2 # (beep beep)
- You’ll hear an additional set of tones (beep beep) when it has un-paired with your hub.
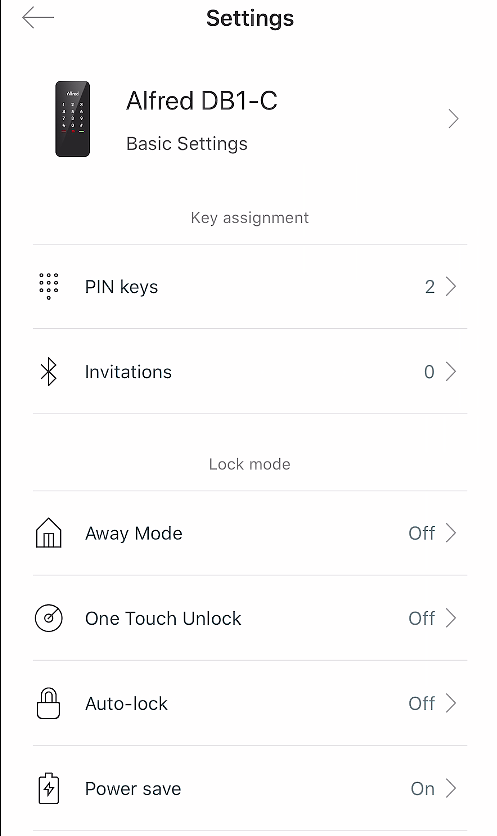
Additional features in the app settings (some of which are also available from the keypad) include:
- Adding PIN keys
- Inviting app users (app only)
- Setting Home/Away mode
- One Touch Unlock (geofence enabled – requires setup in the app)
- Auto-lock (30 seconds)
- Power save
- Voice (Not available on the DB1 model)
- Change Master Passcode
- Update software (this is not for the device firmware)
- Change Lock Name (app only)

General Aesthetics
No matter how you slice it, this is a great looking lock. According to my wife (and many others) it take on the appearance of a smart phone. So much so that it uses a phone style keypad number setup rather than those you see on most smart locks. The only drawback to this approach is that rather than a gear (for settings) and a lock (for executing the unlock command after PIN entry), they use the asterisk (*) and pound/hash (#). This may be a bit confusing for family members if you are migrating from a different smart lock.

The keypad is also very slim and is the slimmest that I’ve tested. Even thinner than the lock that claims to be the thinnest. It’s easy to see that the lock is well built and sturdy.
The motor is also super quiet. Compared to other locks that is.
Smart Home Reliability
As is normal, I tested the snot out of this lock. Cycle and Keypad tests were performed from Hubitat Elevation, VeraPlus and SmartThings and here are the results.
NOTE: All tests were performed on Alfred Lock Firmware 1.05. There are known problems with Firmware 1.04 on SmartThings. If you are having problems, check your firmware and contact Alfred.
Cycle Commands from the Hub – success measures both the command was executed by the lock and the status was successfully sent back to the hub.
| Test ID | Hub | Target Cycles | Locked Success | Unlocked Success | Notes | Reliability |
| 1 | HE | 200 | 100 | 100 | 6’ from Hub | 100% +/- 0% |
| 2 | HE | 800 | 397 | 394 | 6’ from Hub | 99.2% +/- 0.3% |
| 3 | HE | 250 | 123 | 123 | 6’ from Hub | 98.8% +/- 0.4% |
| 4 | ST | 50 | 25 | 25 | 6’ from Hub | 100% +/- 0.0% |
| 5 | ST | 250 | 124 | 121 | 6′ from Hub | 98.2% +/- 0.2% |
| 6 | Vera | 100 | 49 | 49 | 6’ from Hub | 98.5% +/- 0.5% |
| 7 | Vera | 100 | 49 | 49 | 6’ from Hub |
98.5% +/- 0.5% |
| 8 | App | 50 | 25 | 25 | Bluetooth | 100% +/- 0% |
| OVERALL | ALL | 1900 | 940 | 933 | N/A | 98.9 +/- 0.3 |
In all cases (Hubitat, SmartThings, and Vera), the lock did as commanded but in certain instances the hub itself did not update. This is common across nearly every smart lock I’ve tested. In fact, it is common across ALL Z-WAVE DEVICES I’ve tested. It’s often difficult for me to pin down if it’s the hub or the device. In the case of the Yale YRD256 I confirmed that it was indeed the lock (review here). For the Alfred DB1 it was impossible to tell. For more information on how I test locks, visit this page.
Cycle Commands from the Keypad – success measures if the lock sent the status back to the hub and sent the correct user-id that performed the unlock action.
| Test ID | Hub | Target Cycles | Locked Success | Unlocked Success | Reliability |
| 1 | HE | 100 | 50 | 50 | 100% |
| 2 | ST | 20 | 10 | 10 | 100% |
| 3 | Vera | 20 | 10 | 10 | 100% |
Thumbscrew Cycles – success measure if the lock sent the correct status back to the hub when manually turning the thumbscrew.
| Test ID | Hub | Target Cycles | Locked Success | Unlocked Success | Notes | Reliability |
| 1 | HE | 50 | 25 | 25 | Through range extender @ 6’ | 100% |
| 2 | ST | Not performed | ||||
| 3 | Vera | Not Performed |
Jamming and Alerts 
All Lock Models – When the lock detects a jam it goes into a high power mode to try to move past the problem. If Audio Feedback is turned on, an audible tune plays indicating that there is a problem. It actually goes into 4 cycles of increased pressure, each followed by an alarm. The final alarm is longer than the previous alerts. I like that it tries to power through by increasing the pressure each time and that it tries 4 times to get the job done.
Note: Constant high-power locking attempts will reduce the battery life. If you have an alignment issue with the door, I strongly recommend that you get it fixed. It’s a matter of both cost and security.
There is no alert in the Alfred app that notifies you of a jam.
Z-wave – There is no Jam signal that gets sent back to the hub (I believe the generic Z-Wave standard does not support it). If Audio Feedback is turned off, you will also be turning off the audible jam alert.
Keypad
As previously mentioned the keypad is super sexy. I’m knocking off 1/2 point due to the issue with the asterisk (*) and pound/hash (#) symbol. For fingerprint collection, it doesn’t show them as readily as other glossy keypads. Add in the phantom pins (mentioned below), it’s really a non-event in my opinion.
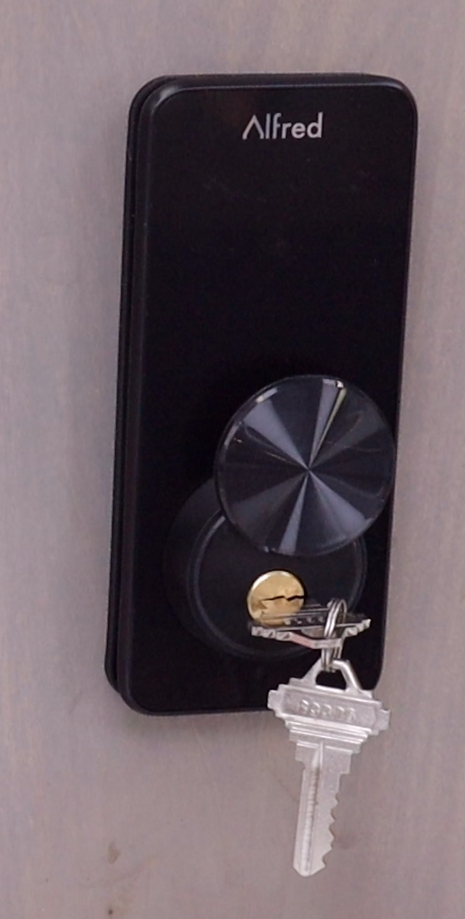
If you’re looking for the keyed version, the keypad sits just above a disk. The key slot sits under the disk. Rotate the disk to reveal the key-slot.
Pin Codes
The lock supports up to 20 pin codes. Pin codes can vary from 4 to 10 digits and do not allow 4 or more easily guessed digits. By this I mean that you can’t use four repeating (e.g. 1111) or sequential (e.g. 1234) digits in your pin. It’s a nice security feature.
The DB1 also allows for phantom pins, meaning you can enter an unlimited amount of meaningless numbers in from of a valid pin before pressing the pound (#) key and the lock will still open. If someone outside your family is with you at the door, you can enter twenty (for example) random numbers and then your real pin followed by the pound (#) key and the lock will still open. The requirement to press the pound (#) is nice in that it prevents people from just pressing digits until the door unlocks.
Phantom pins also allow you to hit the unused numbers on the keypad making it harder for a would be thief to figure out your pin if it only involves a few numbers.
Smart Home Integration
This lock supports all Smart Home Integrations including sending the last user, that activated the keypad, back to the hub.
Auto Unlock on Arrival
The Alfred DB1 has a feature called one-touch unlock that is enabled by the Alfred app. Set your home location using the geofence tool in the app, then enable the setting. You can set a timeout of either 5 minutes or indefinite. With the five minutes setting, you’ll have that long to press the lock (no PIN code required) and the lock will unlock. Once the feature is used, it can’t be used again until you leave and reenter the geofence. If you have it set to indefinite, the lock will wait essentially forever for you to use the one-touch unlock feature. I recommend leaving the setting at 5 minutes.
For me, the one-touch unlock worked like a champ every time, as long as I had the app allowed to run even in the background. If you give the app permission to use your location only while the app is open, you will need to open the app before one-touch lock will work. Balls in your court.
Door Open Alerts 
There are no door open alerts provided by the DB1. This doesn’t bug me since I have door sensors connected to my smart home hub that takes care of that feature. I don’t mark down Z-Wave locks for a lack of this feature since there are better ways. For me, it would be a waste of effort to incorporate this function into a lock of this type.