29 Home Automation Tricks
Here is the How behind the What. Since I use the Hubitat Elevation (HE) Home Automation Hub, all examples are based on HE and Alexa.
Wan’t more help? Join the DIY Smart Home Guy Facebook Group! It’s the best place to ask questions and get help on topics covered in my videos and on my website. There are lot’s of other smart people there as well. If I can’t help, maybe someone else can. Give it a shot. |
1. Automatically Turn On Bathroom Light to Dim Level (only during the night)
Components I’m Using:
| Device | Qty |
| Motion Detector | 1 |
| Contact Switch | 1 |
| In-wall dimmer | 1 |
Hubitat Rule:
This is the rule for turning the light on dim at night. The rule that turns it off is shown in Example #8 below.
The rule uses Modes to prevent the rule from being triggered during unwanted times. Also, the door is verified to be open or it wont run. This way if you adjust the light while the door is closed, new motion wont re-dim the light.

Figure 1.1
2. Automatically Turn On Kitchen Light to Dim Level (only during the night)
Components I’m Using:
| Device | Qty |
| Motion Detector | 1 |
| RGBW Can Light | 1 |
| In-wall Switch | 1 |
The In-wall switch is wired in this video.
Hubitat Rule:
In this rule I only worry about the change in the motion state. It’s self contained to turn the light off after a while and keep trying if motion becomes active again.
The second ELSE-IF is for Example #4 mentioned below.

Figure 2.1
3. Hot Water Pump Control
This Example monitors for motion in the areas where water is. When motion is detected in any area, the pump turns on. Once all motion is inactive for 20 minutes, the pump turns off.
Components I’m Using:
| Device | Qty |
| Motion Detector | varies |
| Watts Hot Water Recirculating Pump | 1 |
| Power Switch (for pump) | 1 |
Hubitat Rule:
This is pretty simple and does not require Rule Machine. Instead I used the Hubitat Motion Lighting App as follows:
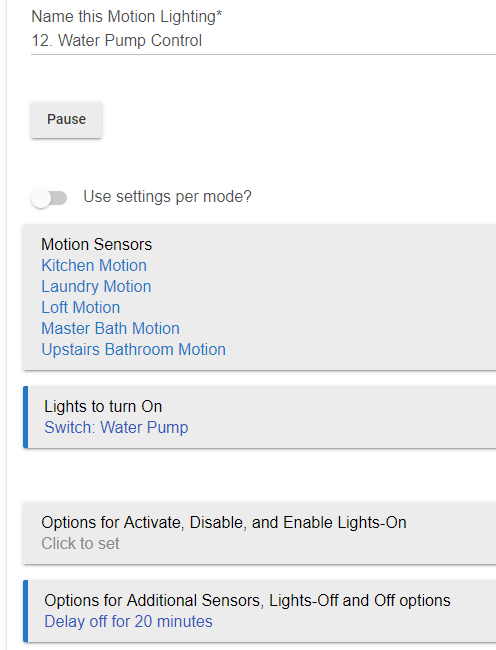
Figure 3.1
4. Automatically Turn On Kitchen Lights for First Use in the Morning
Components I’m Using:
| Device | Qty |
| Motion Detector | 1 |
| RGBW Can Light | 3 |
| In-wall Switch | 1 |
The In-wall switch is wired in this video.
Hubitat Rule:
This is the second half of Example #2 shown above. Here you only need worry about the second ELSE-IF statement.
Figure 4.1
5. Master Bathroom Lighting Control
There are several rules that are associated with the Master Bath light switch. This is more complicated than it needs to be due to the Zigbee bulbs not reliably turning on and off. So, there is logic that cleans up the state of the lights.
Components I’m Using:
| Device | Qty |
| In-wall Switch | 1 |
| Zigbee White LED Bulbs | varies |
Hubitat Rule:
| Taps | Direction | Description |
| 1 | Up | Turns on John’s set (4) of Zigbee lights and ensures that the Wife’s set (4) is off. |
| 1 | Down | Turns off both sets (2×4) of lights. |
| 2 | Up | Turns on both sets (2×4) of lights. |
| 2 | Down | Turns on Wife’s set (4) of lights. |
For simplicity, I’m only showing the Single Tap up. You’ll get the idea for other automation’s where you have similar problems. You’ll notice at the bottom of the rule I call the Garage Warning rule which is explained later in Example #18.

Figure 5.1
The rule first attempts to turn the lights on and off as a normal group. This works about 90% of the time. If one light (and it’s usually the same one) decides to be stubborn (detected by the IF statement), then a cleanup routine is triggered.
The cleanup repeats the actions for individual lights since the hub thinks the group is already on or off per the last command. Once all lights are in there proper state, the Repeat function is terminated. If it can’t get it right in 4 tries, the Repeat terminates and my wife yells at me to fix the lights (which doesn’t happen now that it repeats four times).
6 & 7. Master Closet & Kids Bathroom Lighting Control
This is pretty simple and only uses the Hubitat Motion Lighting App.
Components I’m Using:
| Device | Qty |
| In-wall Switch | 1 |
| Motion Detector | 1 |
Hubitat Rule:
Both the Master Closet and Kids Bathroom control are essentially the same. Only the Master Closet lighting is shown.
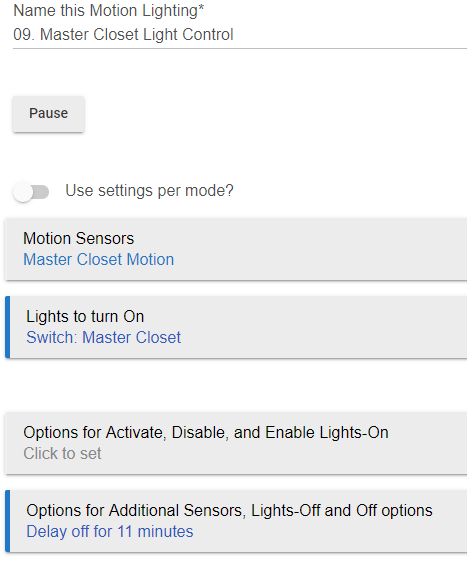
Figure 6.1
8. Automatically Turn On Toilet Light (only during the day)
This is an extension of Example #2 (but a different rule). This rule is based on the toilet door closing.
Components I’m Using:
| Device | Qty |
| Motion Detector | 1 |
| Contact Switch | 1 |
| In-wall dimmer | 1 |
Hubitat Rule:
The first IF is a backup to Example #2 in the event that the motion detector didn’t trigger. When the door closes, it runs the same Action.
The first ELSE-IF automatically turns on the toilet light to 75% at all other times of day (when not in the night modes) when the door is closed.
The final ELSE-IF runs when the door is opened and seeks to turn off the toilet light. It’s only allowed to turn the light off once motion has stopped and the door remains open.
The final ELSE-IF embedded IF prevents the light from turning off if a second person goes into the bathroom while the routine is trying to turn off the light. This stops the annoying light-turns-off-by-itself problem.
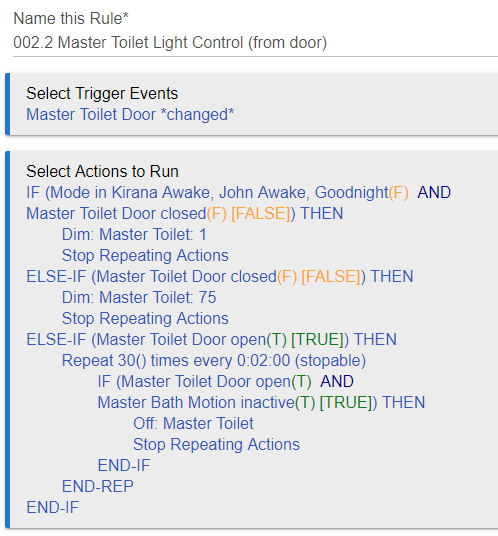
Figure 8.1
9 & 10. Master Bathroom Lighting Control – John’s Shower Mode
This is an extension of Example #5 – same control switch (Inovelli Red Series On/Off Switch).
Components I’m Using:
| Device | Qty |
| In-wall Switch for Master Control | 1 |
| Zigbee White LED Bulbs | varies |
| Other Z-Wave Switches (slaves) | varies |
| iBlinds Controller | varies |
Hubitat Rule:
| Taps | Direction | Description |
| 5 | Up | Turns on ALL Master Bath associated lights and sets the blinds to privacy mode. |
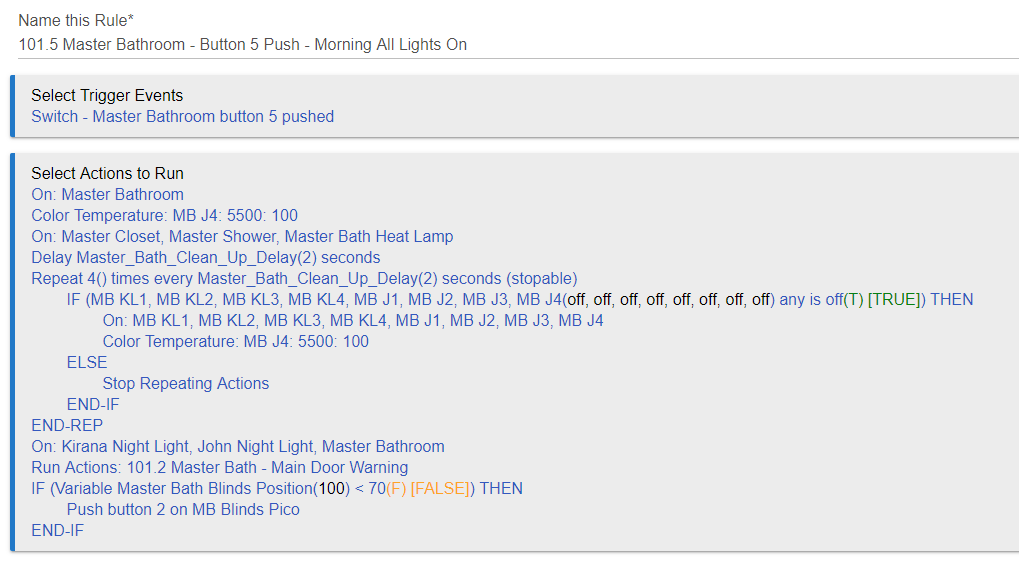
Figure 9.1
Similar to other Examples for the bathroom lights (noted above), the Zigbee lights require a cleanup routine. the Repeat function ensures that all problematic lights turn on (but decides to fail after four attempts to prevent an endless loop).
After all lights are on the Main Door Warning kicks in to control the state of the Garage Door Warning lights.
(10) Finally, if the blinds aren’t already closed to a reasonable level, the close to the privacy setting (which is pre-programmed on the Blinds Pico Remote button 2).
11. Master Bathroom One-Touch Off
This is an extension of Example #10 – same control switch (Inovelli Red Series On/Off Switch). This has two modes, one for morning, and one for evening.
Components I’m Using:
| Device | Qty |
| In-wall Switch for Master Control | 1 |
| Zigbee White LED Bulbs | varies |
| Other Z-Wave Switches (slaves) | varies |
| iBlinds Controller | varies |
Hubitat Rule:
| Taps | Direction | Description |
| 7 | Up | Turns on ALL Master Bath associated lights and sets the blinds to privacy mode. |
Since this has those problematic Zigbee lights, we must once again deal with the stubborn lights (that sometimes refuse to turn on or off). I’m beginning to realize that I should have a generic cleanup rule that I call instead of dealing with it in every rule. Oh well.
Any time other than my morning routine (MODE John Awake) or daytime (MODE Day), I don’t let the rule open the blinds or turn off certain lights, since during those times I want the specific lights on and the blinds to whatever position I’ve set.
The cleanup portion of the rule can stop the Repeat if the problematic lights has all turned off.
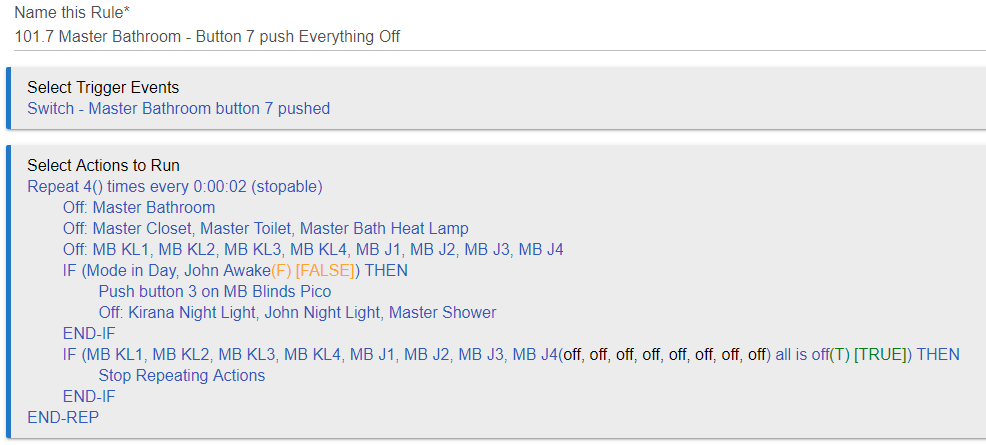
Figure 11.1
12. Garage Door Open Warning Lights
This was a bit more difficult to create the rules for, so there will be some explanations required. There are three lights and each is controlled differently.
Components I’m Using:
| Device | Qty |
| In-wall Switch for Lighting Control | 1 |
| Zigbee RGBW A19 Bulb | 1 |
| Z-Wave Garage Door Opener | 1 |
| Contact Sensor | 1 |
I use the GoControl GD00Z-4 Z-Wave Garage Door Opener and a Contact Sensor to main open/close indication. I find the contact sensor more reliable. All of my indications are triggered from the contact sensor and not the door opener itself.
Hubitat Rules:
OFFICE: My office let setup is pretty simple, just a light that turns red or green. In the rule below you will see where my office (Studio Color) is turned red or green based on the open/close state of the door respectively.
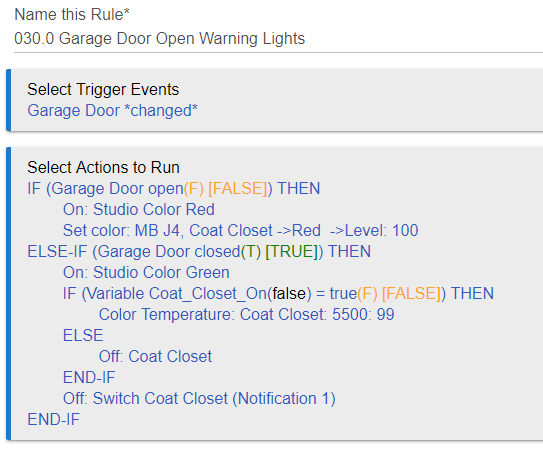
Figure 12.1
COAT CLOSET: The closet light is a bit more complex since it is also used for real lighting in my home. There are a few rules that control the behavior of the light.
The Rule in Figure 12.1 above sets the Coat Closet light to red whenever the Garage Door is open, regardless of the state of the Coat Closet Light. There’s also a boolean variable (Coat_Closet_On) that is set any time the Coat Closet light is manually actuated to On (see Figure 12.2 below). If the boolean is True (On) and the Garage Door closes, it restores the Coat Closet to the normal on-white color. If the boolean is False (off), the light is turned off.
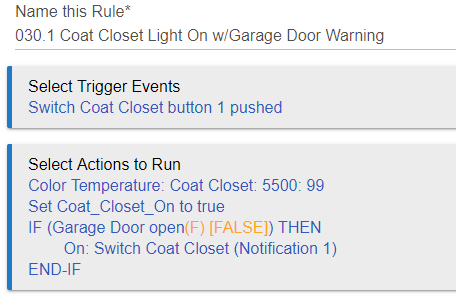
Figure 12.2
If the closet light is needed while the Garage Door is open, when the light is turned on it takes over the light turning it white and the switch notification LED is turned on flashing red.
Similarly, as shown in Figure 12.3 below, if the Coat Closet light is turned off, a rule checks to see of the garage is open and sets the light to the correct state.
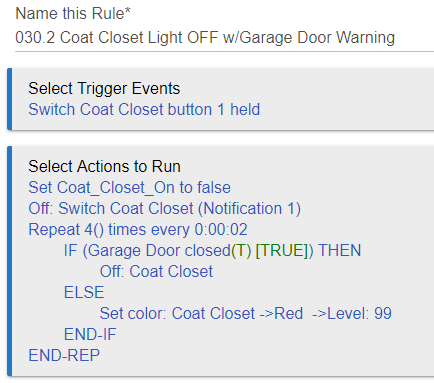
Figure 12.3
13. Garage Door Close from Smart Switch
This is pretty straight forward. I’m using the shortcut button on the Inovelli Red Series On/Off switch.
Components I’m Using:
| Device | Qty |
| In-wall Switch for Lighting Control | 1 |
| Z-Wave Garage Door Opener | 1 |
Hubitat Rules:
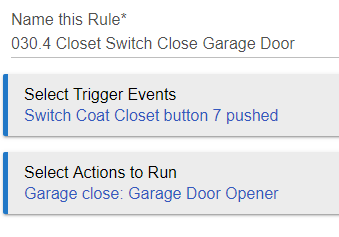
Figure 13.1
14. Auto-Lock Front Door from Garage Door Close
Components I’m Using:
| Device | Qty |
| Z-Wave Garage Door Opener | 1 |
| Contact Sensor | 1 |
| Z-Wave Door Lock | 1 |
Hubitat Rules:

Figure 14.1
15. Door Unlock Warning in Master Bathroom
I normally run this rule with my front door lock, but I’m in the process of replacing. In the mean time I’ve wired this into my front door contact sensor. It will work either way.
Components I’m Using:
| Device | Qty |
| Contact Sensor | 1 |
| Z-Wave Door Lock | 1 |
| Smart RGBW A19 Bulb | 1 |
Hubitat Rules:
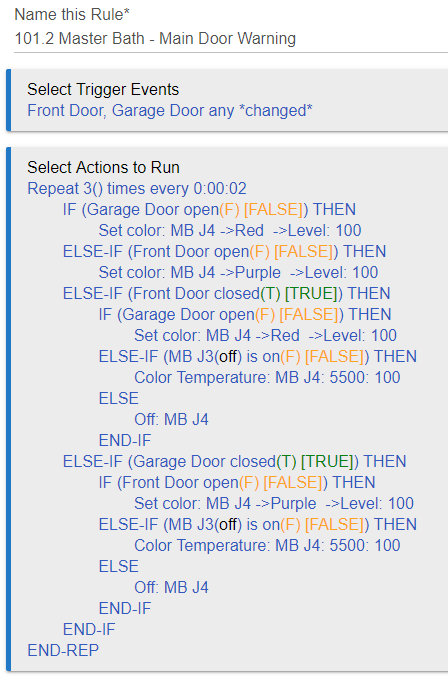
Figure 15.1
16. Door and Window ‘Eco Mode’ w/Lights
Coming Soon – I’m Currently updating these from Rule Machine 3 to Rule Machine 4. One updated, I’ll post here.
17. Door and Window ‘Eco Mode’ w/Thermostat
Coming Soon – I’m Currently updating these from Rule Machine 3 to Rule Machine 4. One updated, I’ll post here.
18. Auto-cycling Fans
In this example, I’m using a temperature sensor that’s incorporated into a motion/multi-sensor. In two rooms I use the Ecobee thermostat sensors and they work the same as the multi-sensors.
Components I’m Using:
| Device | Qty |
| Contact Sensor | 1 |
| Z-Wave Door Lock | 1 |
| Smart RGBW A19 Bulb | 1 |
Hubitat Rules:
I use a Global Variable (Fan_AutoOn_Temp in Figure 18.1) to define the trigger value for the fan. This allows me to change the temp for all rules rather then needing to go into each fan rule separately.
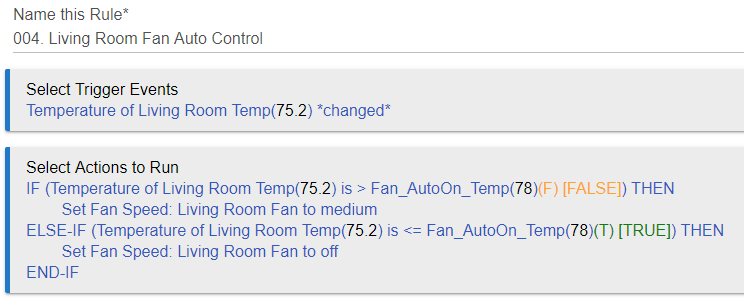
Figure 18.1
We like to have the nook fan come on at a lower temperature. To use the same variable, I use the Variable Offset feature of Rule Machine as shown in Figure 18.2 below. You’ll need the ‘Relative to a variable’ option selected to use the offset feature.
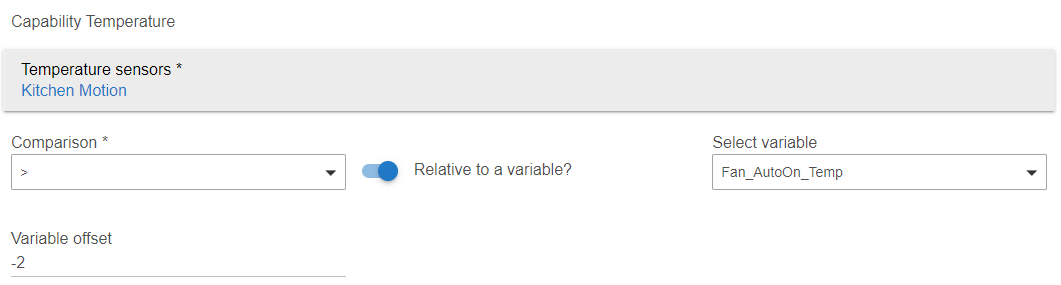
Figure 18.2
19. Sunset Accent Lights
The Sunset Accent Lights control is accomplished using Scenes, Scene Transitions, and Rule Machine 4.0. I’ll give you the step by step. I’m using Zigbee light strips and bulbs, but Z-Wave strips would work as well.
Components I’m Using:
| Device | Qty |
| LED Light Bulb | varies |
| LED Light Strips | 2 |
Hubitat Rules:
This uses Scenes, Scene Transitions, and Rule Machine.
STEP 1: Know you’re color transitions and how they work. In Hubitat, you’ll need to provide a (dimmer) Level (1-100), a Hue (1-100), and a Saturation (1-100). The Hue is the color and is the most important for this particular process.
Scene transitions work buy varying moving the hue number (as well as Level and Saturation) as it gradually transitions from one scene to another. For example if you want to go from Red (Hue 99) to Blue (Hue 66), the transition will count down from 99 to 66. Level and Saturation work the same way. You’ll want to be careful on your transition if you’re trying to go from Orange (Hue 1) to Red (Hue 99). Hubitat will count up from 1 to 99 and you will transition through Yellow, Green, Blue, Violet, etc. It’s best to pick colors that transition through logical colors on the Hue scale.
STEP 2: Create your Scenes. I use 6 scenes and have rules (2 of which are described below) that control the transitions.
Scene 0
Studio Back Wall Color: on, level 50, hue 6, sat 100
Bar Accent: on, level 50, hue 6, sat 100
Accent Lights: on, level 50, hue 6, sat 100
TV Backlight: on, level 50, hue 6, sat 100
Wine Shelf: on, level 50, hue 6, sat 100
Scene 1
Studio Back Wall Color: on, level 40, hue 1, sat 100
Bar Accent: on, level 40, hue 1, sat 100
Accent Lights: on, level 40, hue 1, sat 100
TV Backlight: on, level 40, hue 1, sat 100
Wine Shelf: on, level 40, hue 1, sat 100
etc…
STEP 3: Define your Scene Transitions

Figure 19.1
Creating the transition is pretty simple. Define the starting scene and the ending scene. The transition time defines how many seconds you want Hubitat to take to get from Scene 1 to Scene 2, in my case 5 minutes. The Transition Interval is how often Hubitat updates to the new transition value (in my case every 5 seconds). This provides a very smooth transition between the colors.
STEP 4: Create the Rule Machine Rules
In Figure 19.2 below, I trigger the transition 30 minutes before sunset. I also created a Local Variable to the Rule called Transition_Phase, which allows the Rule to know what to do next. The variable is initialized to Zero (to reset it from the last run).
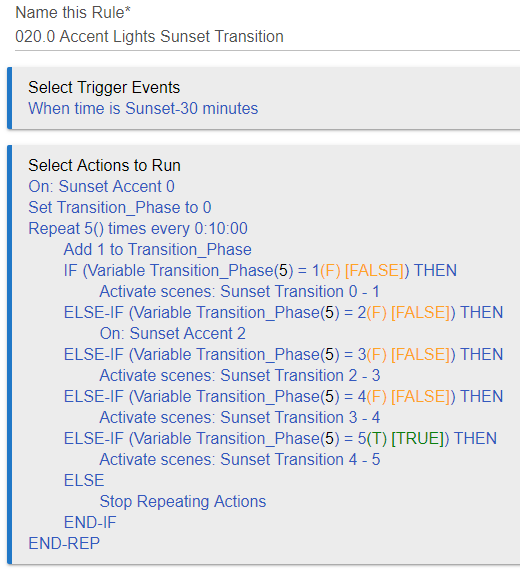
Figure 19.2
Then I run a repeat command (5 times repeating every 10 minutes). Each time it runs, it increments the Transition_Phase variable by 1. Then the Conditional Logic kicks in to know which Scene Command to provide.
You’ll notice that on the on the first ELSE-IF line, when the Transition_Phase is at 2, I don’t use a transition. This is because Phase 0 to Phase 1 goes from Hue-6 down to Hue-1, and Phase 2 starts at Hue-96. I don’t want to go from Hue-1 up to Hue-96 (Scene 2), so I just set everything to Scene 2 and the jump is barely noticeable. Then all successive transitions move down from Hue-96 and settle at Hue-67.
20. Vacation Lights
A majority of our lights are on schedules, even those that have other triggers. This was lights come on and off normally throughout the night, home or not. We avoid using Home/Away for triggering lights since we always want the normal lived in look. We reserve Home/Away for security and HVAC.
21. Sunset Mode
This example uses Modes. At the time I set this up I was having trouble getting modes to trigger properly, and I was also having problems with the Sunset trigger. I’m not sure if it was me, my understanding of the hub, or a bug(s) in Hubitat. Either way, it’s working fine, so why change it.
Hubitat Rules:
The first rule (Figure 21.1 below) sets the hub into Sunset Mode.

Figure 21.1
As mentioned above, there was trouble with my Sunset rules firing at the wrong time (they would fire 12 hours before). But for some reason, it worked fine inside a rule (no clue, I just know the lights were coming on in the morning and evening). The IF statement protects the rule from firing in the morning.
Also, the example in Figure 21.2 may better be supported by a Scene. I’ve just been too lazy to convert it.
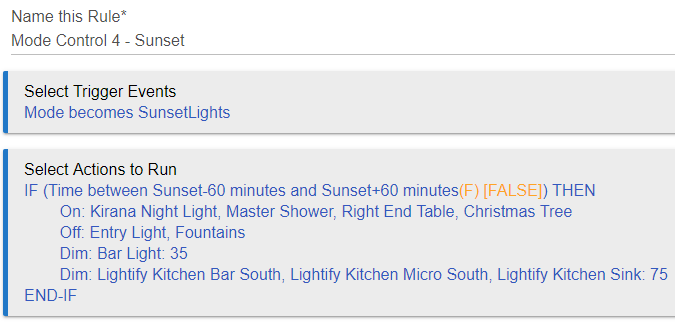
Figure 21.2
22. Garage Motion Lighting
Simple rules using the Hubitat Motion Lighting app for motion control.
Components I’m Using:
| Device | Qty |
| Motion Sensors | 2 |
| In-wall Smart Switch | 2 |
Hubitat Rules:
The Motion Lighting rule is triggered when either of two motion sensors are active. When motion stops on both sensors, the lights turn off after 1 minute.
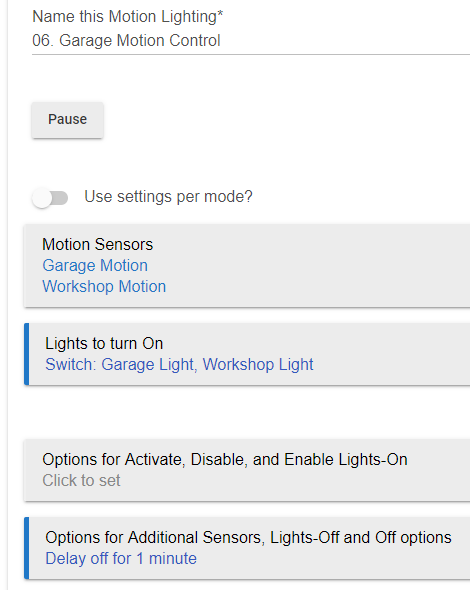
Figure 22.1
23. Garage Door Open Lighting
When the garage door opens between sunset and sunrise, this rule turns on the garage lights. And no, I didn’t mean to crash into the garage door!
Components I’m Using:
| Device | Qty |
| Contact Sensor (Garage Door Open) | 1 |
| In-wall Smart Switch | 2 |
Hubitat Rules:
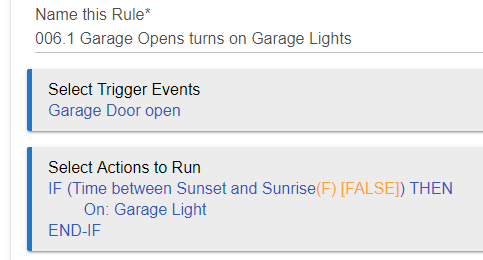
Figure 23.1
24. Front Porch Motion Lights
Uses an advanced feature in the Motion Lighting app. Motion detected turns on lights but only when Hubitat is in the desired Mode.
Components I’m Using:
| Device | Qty |
| Outdoor Motion Sensor | 1 |
| In-wall Smart Switch | 1 |
| In-wall Dimmer | 1 |
Hubitat Rules:
The outdoor lights are Zigbee lights controlled by a Zooz Zen26. The internal relay is disabled so the circuit stays powered at all times. (Video Here). When motion is detected (Figure 24.1), the Zen26 gets a single-tap-up event, which turns on the porch lights. The button definitions are provided in Figure 24.2.
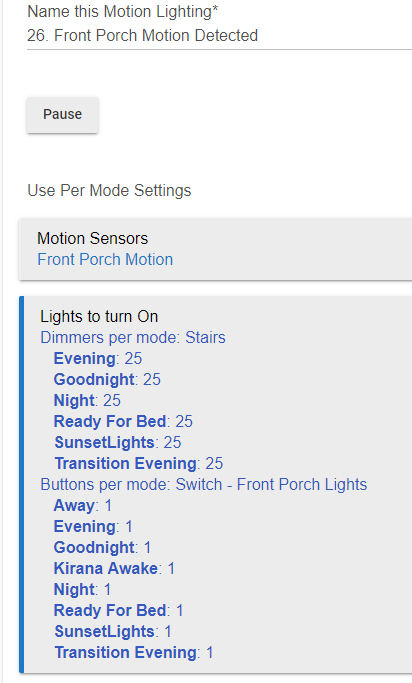
Figure 24.1
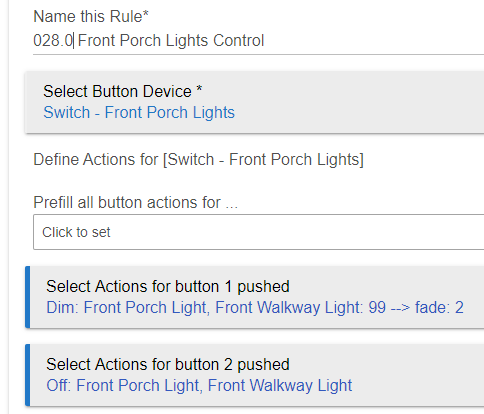
Figure 24.2
25. Camera’s
Ring Video Doorbell (Video Review Here) (Purchase Here)
Ring Floodlight Cam (Video Review Here) (Purchase Here)
26. Door Unlock Auto Lights On
When the front door is Unlocked at night, the entry light automatically turns on. The entry light automatically turns off when the door is locked.
Components I’m Using:
| Device | Qty |
| Smart Deadbolt Lock | 1 |
| In-wall Smart Switch | 1 |
Hubitat Rules:
This rule controls both the Lock and Unlock behavior for light control. Notice that it also ensures that the light is Off and it’s night time before turning on the light. In all cases I turn the light off when the door is locked.
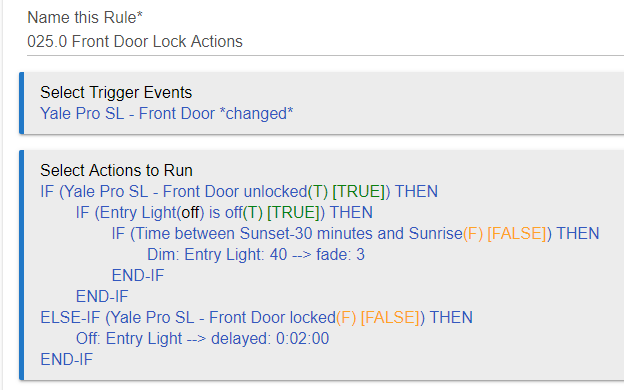
Figure 26.1
27. Alexa Announce Who Unlocked the Door
There are many ways to do this, but I chose this since I didn’t want to grow through the trouble of using a Third-Party app in Hubitat. The Apps I tried were very slow, and this works faster than anything else I tried. It’s a bit of a hack, but it does work.
You’ll want to make sure you are using a lock that can support unique hub-controlled user codes for each user. The lock must be able to reliably report which user unlocked the door.
Components I’m Using:
| Device | Qty |
| Yale Assure YRD256 Z-wave Lock | 1 |
| Amazon Echo |
Hubitat Rules:
STEP 1: On your Z-Wave lock, assign each user a unique unlock code. Make sure the family is aware of their codes.
STEP 2: In the Hubitat Device Manager, create a Virtual Lock for each user that you want to announce. It doesn’t matter what the user codes are for this lock. Virtual Locks are necessary since Alexa can only see Locks, Garage Doors and Door Sensors when building Alexa Routines (as shown in Figure 27.5 below).
Make sure you share the Virtual Lock(s) with Alexa.

Figure 27.1

Figure 27.2
STEP 3: Set Up Rule Machine
Create a rule that is Triggered by Any Lock Code as shown in Figure 27.3. Then use conditional logic to Unlock the Virtual Lock for that user.
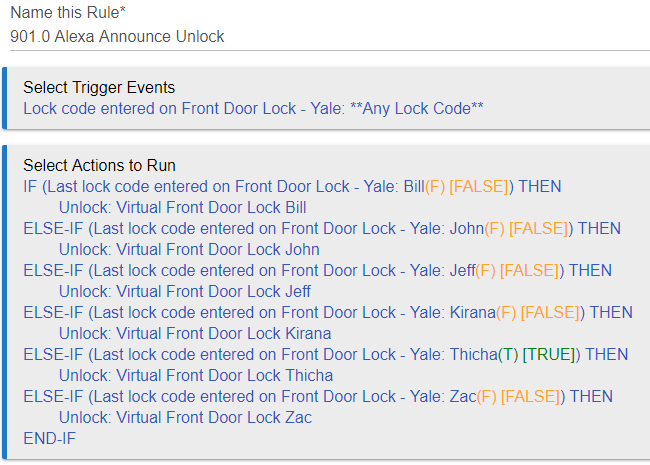
Figure 27.3
STEP 4: Reset all Virtual Locks
Create another rule that Locks ALL virtual locks any time the door is locked as shown in Figure 27.4.

Figure 27.4
Now, every time the door is unlocked by a user code, the virtual lock for that user will unlock. When the door is locked, the rule makes sure all virtual locks are locked.
STEP 5: Configure Alexa
The last step takes place in the Alexa App as shown in Figure 27.5 below.
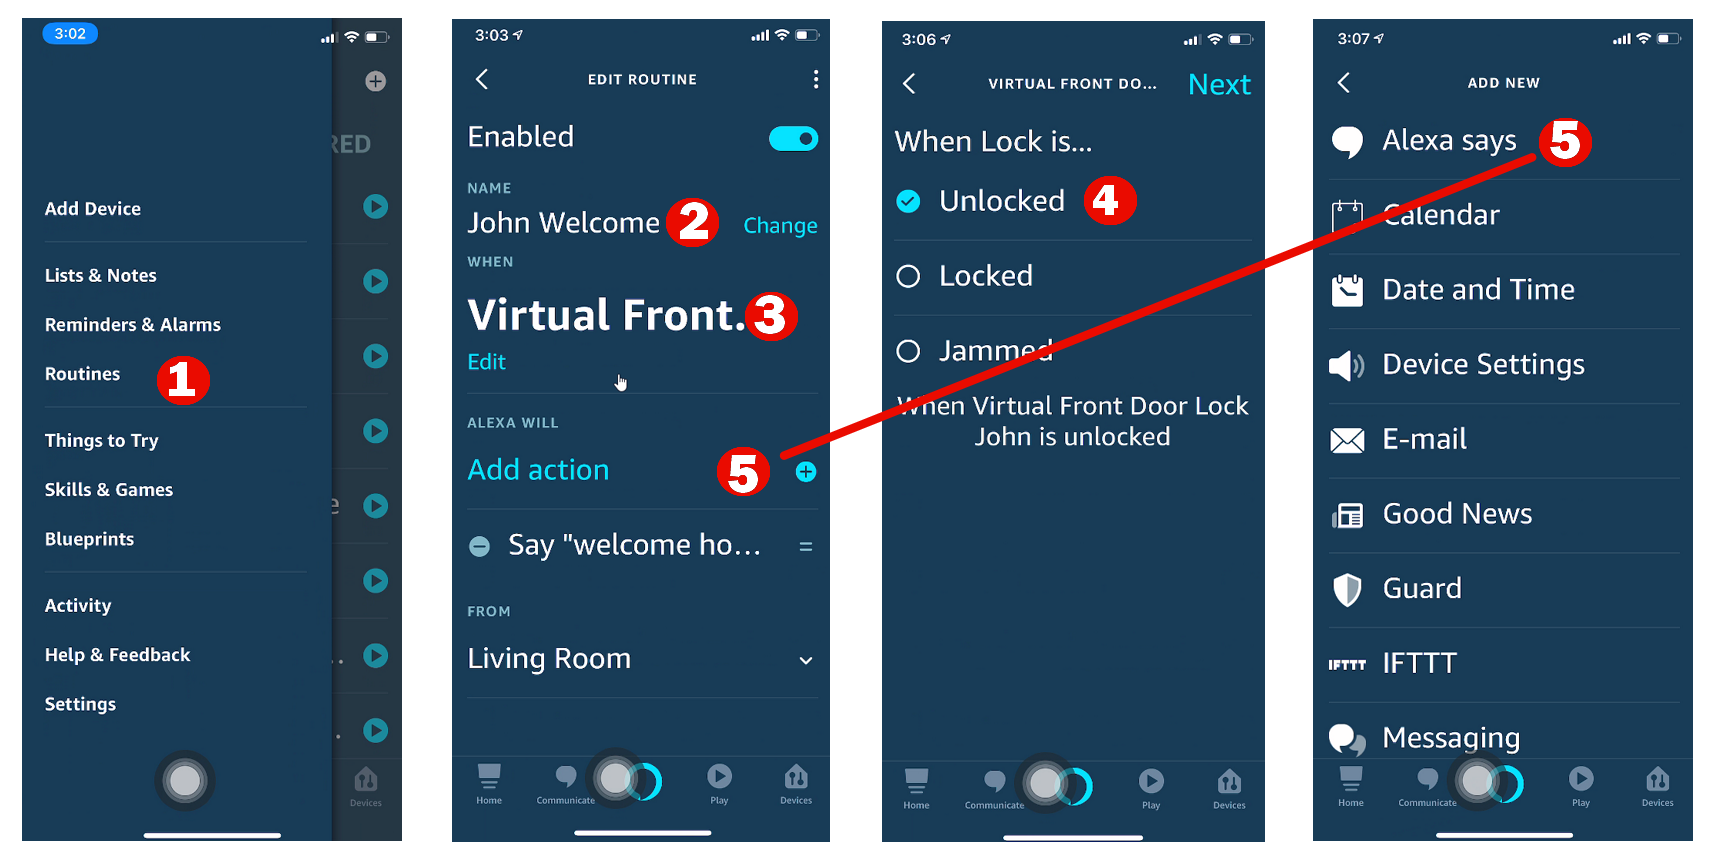
Figure 27.5
- In the Alexa App, find the Routines tab.
- Name the routine something meaningful, preferably associated with the name of the user that is unlocking the door.
- In the ‘When’ section, select the Virtual Lock that was created in Hubitat.
- Select ‘Unlocked’
- Add an action, in my case, I used ‘Alexa Says’ and then ‘Welcome Home John’.
28. Alexa Turns on Television
This is one of the few automation’s that sit outside of Hubitat. For this I’m using the Logitec Harmony Hub (Video Here) linked into my Amazon Echo.
Components I’m Using:
| Device | Qty |
| Logitech Harmony Hub | 1 |
29. Bar Light – Pico Remote Control
We have Pico remotes scattered all over the house. We love these things (Video Here).
Components I’m Using:
| Device | Qty |
| Lutron Smart Bridge Pro | 1 |
| Lutron Pico Remote | varies |
| Lutron Pico Remote Stand | varies |
| Lutron Pico Wallplate Adapter | varies |
Hubitat Rules:
This rule uses a Button Device trigger which enables a multi-button rule in Hubitat. It’s super cool. This allows you to make one master Trigger for the button and set up individual Actions for each button pushed/held/released event on the button. Very handy trigger to master.

Figure 29.1