THIS PAGE IS UNDER CONSTRUCTION – SORRY THAT THE INFORMATION IS INCOMPLETE AT THIS TIME – I’M WORKING ON IT
This information is for reference only. You should always rely on the manufacturer’s instructions when performing switch installations. Manufacturer instructions can change at any time and this website cannot guarantee the accuracy of the information.
WARNINGS AND CAUTIONS:
- TO AVOID FIRE, SHOCK OR DEATH; TURN OFF POWER AT CIRCUIT BREAKER OR FUSE AND TEST THAT POWER IS OFF BEFORE WIRING!
- To be installed and/or used in accordance with electrical codes and regulations.
- If you are unsure about any part of these instructions, consult an electrician.
- Manufacturer smart-switches must be used with compatible devices for multi-location switching.
Welcome to the 4-way switch how-to page. Please read the entire page to familiarize yourself with the content. Four-way switches can be complicated, this page attempts to help you understand your current four-way switch situation, and the solutions that are available to you.
Wan’t more help? Join the DIY Smart Home Guy Facebook Group! It’s the best place to ask questions and get help on topics covered in my videos and on my website. There are lot’s of other smart people there as well. If I can’t help, maybe someone else can. Give it a shot. |
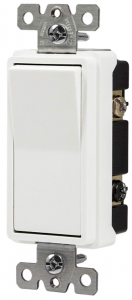
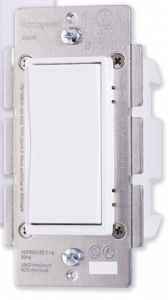
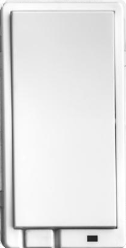
There are currently four different choices for four-way switch installations. These include: A mechanical toggle switch, or dumb add-on switch; A smart auxiliary switch, or a smart momentary switch; Running dual smart switches; and using something like the Lutron Caseta non-neutral switch with a Pico Remote.
| Dumb Add-On | Smart Add-On | Dual Smart Switch | Lutron Pico Remote |
 |
 |
 |
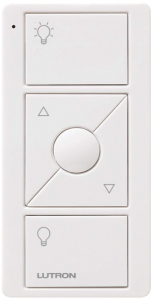 |
| $0 – $4.00 | ~ $20.00 | ~ 25 – $45 | ~ $20 |
When you break down the costs, the toggle, or dumb add-on is by far the cheapest since you can use your existing switch.
Next up is the Smart add-on switch. These run about twenty bucks. Why would you use a remote add-on, or aux switch? Well, if you’re using a dimmer, this is the best way to ensure that you can dim from both locations. The dumb toggle switch will only provide you with on and off capabilities.
Next up is using two smart switches. The cost here is the cost of a full smart switch, so this can get expensive. Why would you use this option? This ensures that all smart switch capabilities are available from either location, such as scene control.
Last up is the Lutron Caseta method, which is popular for its non-neutral capabilities. This option uses the Lutron Caseta smart switch and a Pico remote.
As always, if you’re not comfortable working with electricity, please contact a licensed electrician in your area. Working with electricity is dangerous – if you don’t understand it, call someone that does.
Step 1 – Determine Wiring Method of your Three-way Circuit
Go to the Common Four-Way Switch Wiring Methods page to determine the wiring method for your circuit.
Step 2 – Determine Which Wiring Solution is Applicable
Use the diagram below to determine which wiring solution is applicable for your wiring method. If you have a brand choice, determine if the brand supports the wiring method. See additional notes below the matrix.
| Zooz Gen 1 Inovelli Gen 1 (Solution A) |
Zooz Gen 2 (Solution B) |
Zooz Zen30 (Dual Switch) |
Inovelli Gen 2 (Solution B,C,D,F) |
Honeywell GE HomeSeer (a.k.a. Jasco) (Solution C) |
Lutron Caseta (no neutral) (Solution E) |
Leviton decora smartTM |
|
| Method 1 | Solution F-1 | Solution B-1 | Solution F-1 | Solution B-1 | Solution C-1 | Solution E-1
(Coming Soon) |
Solution LV-1
(Coming Soon) |
| Method 2 | Solution A-2 | Solution B-2 | Solution F-2 | Solution B-2 | Solution C-2 | Solution E-2
(Coming Soon) |
Solution LV-2
(Coming Soon) |
| Method 3 | Solution F-3 | Solution F-3 | Solution F-3 | Solution C-3 | Solution C-3 | Solution E-3
(Coming Soon) |
Solution LV-3
(Coming Soon) |
| Method 4 | N/A | N/A | N/A | Solution D-4 | N/A | Solution E-4
(Coming Soon) |
Solution LV-4
(Coming Soon) |
Step 3 – Pick Your Wiring Solution
If multiple solutions are provided, you have a choice in which one you can use. It is strictly up to you to pick the brand and solution style you desire.
Yellow – These are advanced wiring situations and require both the switch boxes and the light box to be rewired. Alternate solutions are advised.
Red – The switch models do not support this wiring method. Alternate wiring solutions are required. In truth, The may be supported, but I have not been able to verify them. These will be updated as information becomes verified.
See the table below for the switches that fit into the groups. Below is a brief description of each solution.
Step 4 – Pick Your Switches
The following switches have been verified either through personal experience or manufacturers data sheets. I make no claim to the accuracy of this information. It was valid at the time I compiled the information and should be used for reference only. I encourage you to verify this information on your own before you purchase equipment.
| Zooz Gen 1 | Zooz Gen 2 | Zooz Zen30 | Inovelli Gen 1 | Inovelli Gen 2 | ||
| Switch Part # | Zooz Zen21 Zooz Zen22 Zooz Zen23 Zooz Zen24 |
Zooz Zen26 Zooz Zen27 |
Zooz Zen30 | NZW30 NZW31 |
LZW30 LZW30-SN LZW31 LZW31-SN |
|
| Add-on Part # | Mechanical | Mechanical | Virtual Only | Mechanical | use GE, Honeywell, or Mechanical | |
| Notes | Create 3-way through Z-Wave association | |||||
| HomeSeer | GE Enbrighten | Honeywell | Lutron Caseta | Leviton | ||
| Switch Part # | HS-WD200+ HS-WS200+ HS-FC200+ |
14287 14289 14291 14294 14299 46201 46203 43072 43074 |
39348 39351 39354 39356 39357 39358 |
PDW-6WCL-WH-A | DZ15S-1BZ(1) DZ1KD-1BZ(2) DZ6HD-1BZ(2) |
|
| Add-on Part # | HS-WA100+ | 12723 46199 46200 |
39350 | PJ2-3BRL-WH-L01R | DD0SR-10(1) DD0SR-DL(1) DD00R-DLZ(2) |
|
| Notes | P-PKG1WB-WH contains the switch and the Pico at a nice savings | Add-on switch must match the smart switch. |
Overview of Each Wiring Solution
Once you’ve identified your original wiring method and you’ve identified which solution you would like to use, you can pick the switch. No doubt you started your journey with a switch in mind, so it’s important to make sure that the switch will fit your needs. You may need to pick an alternate switch to accommodate your available wiring solutions.
If you’re on the fence due to the availability of multiple wiring solutions, use the below sections to determine which is the correct fit for you. It’s also a good idea to check out the solution diagrams for each switch to determine the complexity of the job your about to undertake.
Solution A – Mechanical Toggle – Aux Switch Rewire Required
Uses a normal three-way switch as the add-on switch. This is also known as a mechanical three-way or a dumb add-on switch. This requires the mechanical switch to be rewired per the appropriate solution diagram.
Pros: Inexpensive
Cons: No dimming capability, does not provide up-is-on/down-is-off experience, no scenes from dumb add-on switch
Click Here for Solution A
Solution B – Mechanical Toggle – Aux Switch Rewire NOT Required
Uses a normal three-way switch as the add-on switch. This is also known as a mechanical three-way or a dumb add-on switch. This DOES NOT require the mechanical switch to be rewired. This is the simplest wiring solution.
Pros: Inexpensive, easy to install
Cons: No dimming capability, does not provide up-is-on/down-is-off experience, no scenes from dumb add-on switch
Click Here for Solution B
Solution C – Smart Add-On – Neutral Required
Uses a three-way aux switch as the add-on switch. This is also known as a smart add-on (not to be confused with a regular smart switch) or momentary aux switch. This requires the mechanical switch to be replaced per the appropriate solution diagram.
Pros: Less costly than dual smart switch, moderately easy to install, provides dimming capability, provides up-is-on/down-is-off experience
Cons: More costly than dumb add-on, no scenes from aux add-on switch
Click Here for Solution C
Solution D – Smart Add-On – Neutral NOT Required
Uses a smart three-way add-on switch. This is also known as a aux switch or momentary aux switch. This requires the mechanical switch to be replaced per the appropriate solution diagram.
Pros: Less costly than dual smart switch, moderately easy to install, provides dimming capability, provides up-is-on/down-is-off experience, great option if there is no neutral wire present
Cons: More costly than dumb add-on, no scenes from aux add-on switch
Click Here for Solution D
Solution E – Lutron Caseta with Pico Remote – Neutral NOT Required
Uses a Lutron Caseta no-neutral dimmer as the main switch and a Pico Remote as the add-on switch. This requires a hub that supports the Lutron Caseta switches or a Hub that can integrate with the Smart Bridge Pro (SmartThings, Hubitat Elevation).
Pros: great option for non-neutral situations, can turn a normal switch into a three-way, picos can also be programmed to run scenes
Cons: More costly than dumb add-on
Click Here for Solution E
Solution F – Dual Smart Switch
Uses two smart switches, one as master and one as slave. Only possible with switches and hubs that support device association.
Pros: user experience same from all switches including multi-tap and scenes
Cons: costly
Click Here for Solution F
Solution LV – Leviton Z-Wave Smart Switch with Add-on
Uses a smart three-way add-on switch. This is also known as a aux switch or momentary aux switch. This requires the mechanical switch to be replaced per the appropriate solution diagram. You MUST use the appropriate Leviton add-on switch. Other brands of add-ons wont work. Check the manual for the Leviton smart switch to verify compatibility.
There are also two options for the on/off switches. You can use a Coordinating Switch or a Matching Switch. The Matching Switch does not work in as many wiring configurations as the coordinating switch.
Pros: Less costly than dual smart switch, moderately easy to install, provides dimming capability, provides up-is-on/down-is-off experience
Cons: More costly than dumb add-on, no scenes from aux add-on switch, limited wiring configurations supported, installation can be confusing due to how Leviton marks their switches
Click Here for Solution LV