How To Connect Ecobee to Hubitat Elevation Smart Home Hub
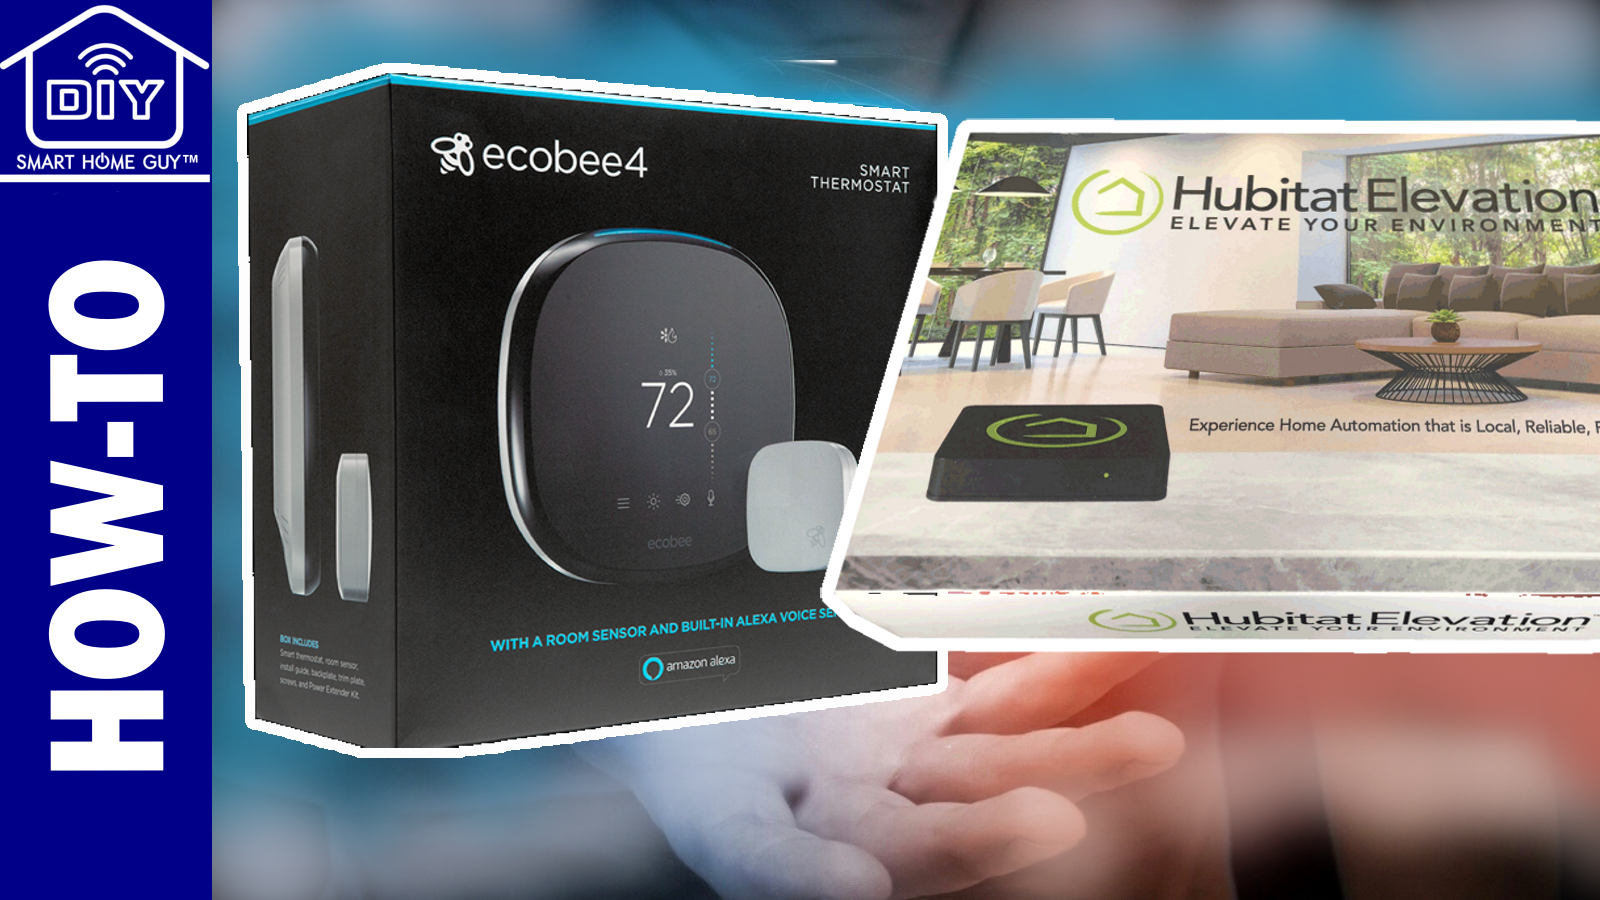
The ecobee thermostat is a crowd favorite amongst smart home enthusiasts. And let’s face it, having a smart thermostat linked to your smart home can create many different cool automations. Even though the ecobee is controlled through the cloud, the locally controlled Hubitat Elevation can still play nicely. The integration allows you to use your Hubitat dashboard to control the ecobee, you can also place controls and temp sensors on dashboards. In my case, I have a pretty cool rule that sets high and low target temperatures based on the state of doors and windows.
This article will help you get the ecobee connected to Hubitat and will provide other information about how to use it within Rule Machine.
 |
 |
 |
Connect Ecobee to Hubitat
Getting the ecobee into Hubitat is pretty straight forward. Hubitat also has a nice tutorial, although it was a little out of date when I put this page and video together. I’ll try to keep this updated, but forgive me if it falls behind. Here are the steps:
- From your Apps tab in Hubitat, click the Install New Built-in App
- Search or scroll to Ecobee Integration and click
- You should see the Ecobee Login on the Hubitat screen
- Use your Ecobee credentials to log into the Ecobee site from Hubitat
- Select your devices, even if you only have one
- Select your sensors, even if you only have one
You’ll need to set the Data Poll Rate. Be careful here. The default is 5 minutes If you use a lower setting, it may cause ecobee to Rate Limit your site. The default setting of 5 minutes is only for pulling data from the ecobee server automatically. If you make changes from Hubitat, they will be sent to the ecobee in real time (of course the Internet is involved, so it may be near real time).
Once the ecobee is installed, you will be able to integrate the following commands directly from your dashboards and Rule Machine.
- Thermostat mode: Auto, Heat, Cool, Off and Emergency Heat (for heat pump systems).
- Set heating point: Your desired heating temperature.
- Adjust heating point: The temperature difference from the heating set point where the system will call for heat.
- Set cooling point: Your desired cooling temperature.
- Adjust cooling point: The temperature difference from the cooling set point where the system will call for cooling
- Fan setting: On or Auto.
If you want to do more than this, like setAway and resumeProgram, you will need to use Custom Commands, also called Custom Actions. These are described next.
Using Custom Commands (a.k.a. Custom Actions)
As I mentioned, I have a routine (described below) that automatically sets my heat and cool settings based on window and door open and close status. To make this work, you will need access to the Custom Commands. Custom Commands are commands that sit outside of the normal smart thermostat specification and must be handled differently. Lucky for us Hubitat allows us to get there. The following instructions are for the current version of Rule Machine 4 as of when I last updated this post.
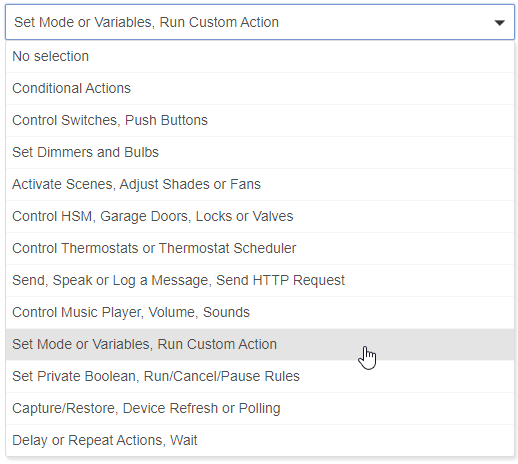
When setting up your actions in Hubitat to set either the setAway or resumeProgram function (or any other custom command), you’ll want to use the Set Modes or Variables, Run Custom Actions choice in the Select Action Type to add drop down menu.
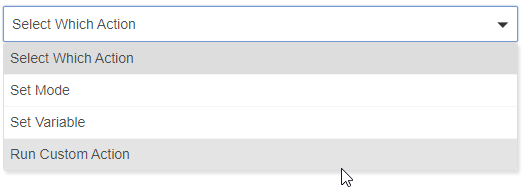
When the next drop down appears, select Run Custom Action.
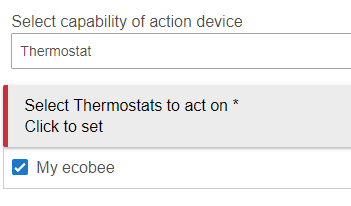
Then you’ll need to set the Capability Type. This will help Hubitat filter down the devices that you’ll be applying the Custom Command to.
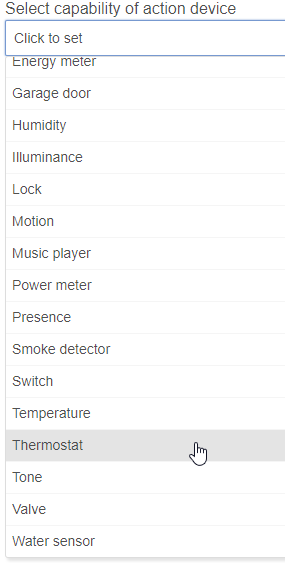
Once the list of thermostats comes up, pick your thermostat from the list.
Then you will want to pick your Custom Command.
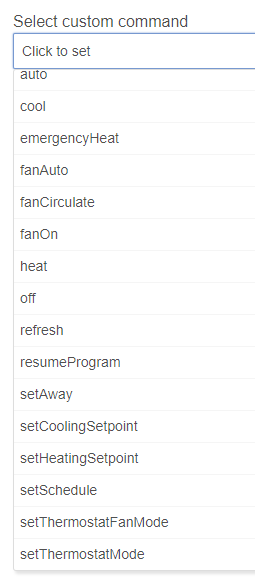
In my case, we selected the setAway command.
Important note: DO NOT PICK A VARIABLE TYPE OR SET A STRING TO SEND. THIS WILL RESULT IN HUBITAT THROWING AN UNHANDLED ERROR AND YOU WONT GET THE DESIRED RESULT.
Once this is complete (along with all the other things you might put into your rule), you’re done!
Automation Ideas
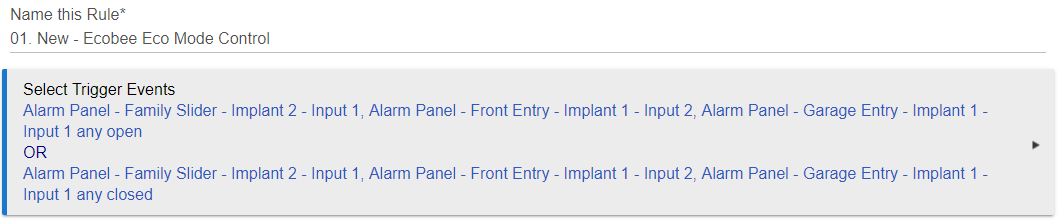
Now for my rule. As you can see, I have the rule set to trigger if any of three (3) doors or windows are open or closed. Anytime, open or close, any of the doors or windows.
On the actions side, I have an Conditional Action that (IF) looks to see if any door is open and (ELSE-IF) all doors are closed.
If any door is open, it captures the current state of my TV backlight (so it can return it to that state later), activates my Green Eco Mode Scene then delays for a period of time. It then checks again to make sure the offending door or window is still open. If so, it fires the ecobee setAway command.
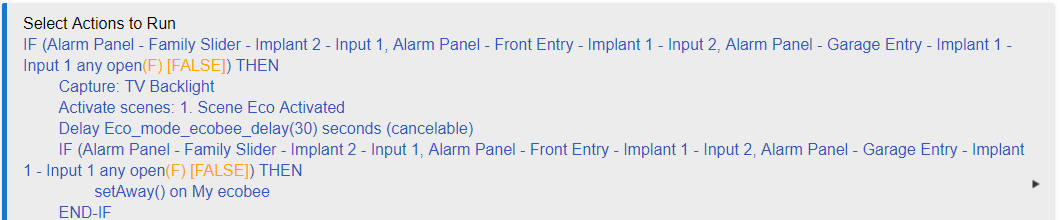
If all doors are closed, then the rule executes a resumeProgram on the ecobee, cancels any delayed action (remember we had the delay before, we need to cancel that so the thermostat doesn’t do the setAway), then restores the TV Backlight to whatever state it captured when the door was open.

And that’s it. Remember, with Hubitat you’re not writing code, you just picking actions, devices and logic. The Hubitat writes the code for you.
END